Categories
Main

How to measure outstretched diagonal leg-span “DLS”

To properly measure a tarantulas true, outstretched diagonal leg-span or “DLS” there can be no noticeable bends in it’s knees. If there are any bends this can throw off the measurement often by a an extreme margin. A scrunched up leggy specimen can measure as little as half it’s actual DLS size!

I personally measure everything we sell and here is roughly how I do it. Keep in mind this is usually done with the tarantula still in it’s enclosure for both the safety of me and the tarantula I am trying to measure.

I had this particular specimen out for a photo shoot she was pretty content in this pose. I figured it would be a good opportunity to take this picture with the caliper. Although the knees are slightly bent in this photo (so this one will measure a little smaller) we can see the caliper reads approximately 2.6 inches diagonal leg-span/DLS.

The absolute best device I have found to measure DLS is a caliper. An analog caliper like the ones pictured have been an indispensable tool in my collection. Just about every tarantula on the website is measured with a caliper.

This 3″ Brass caliper (pictured below) is the one we sell on the website. Here you can see this B. emilia measures about 2 3/4″ DLS. 

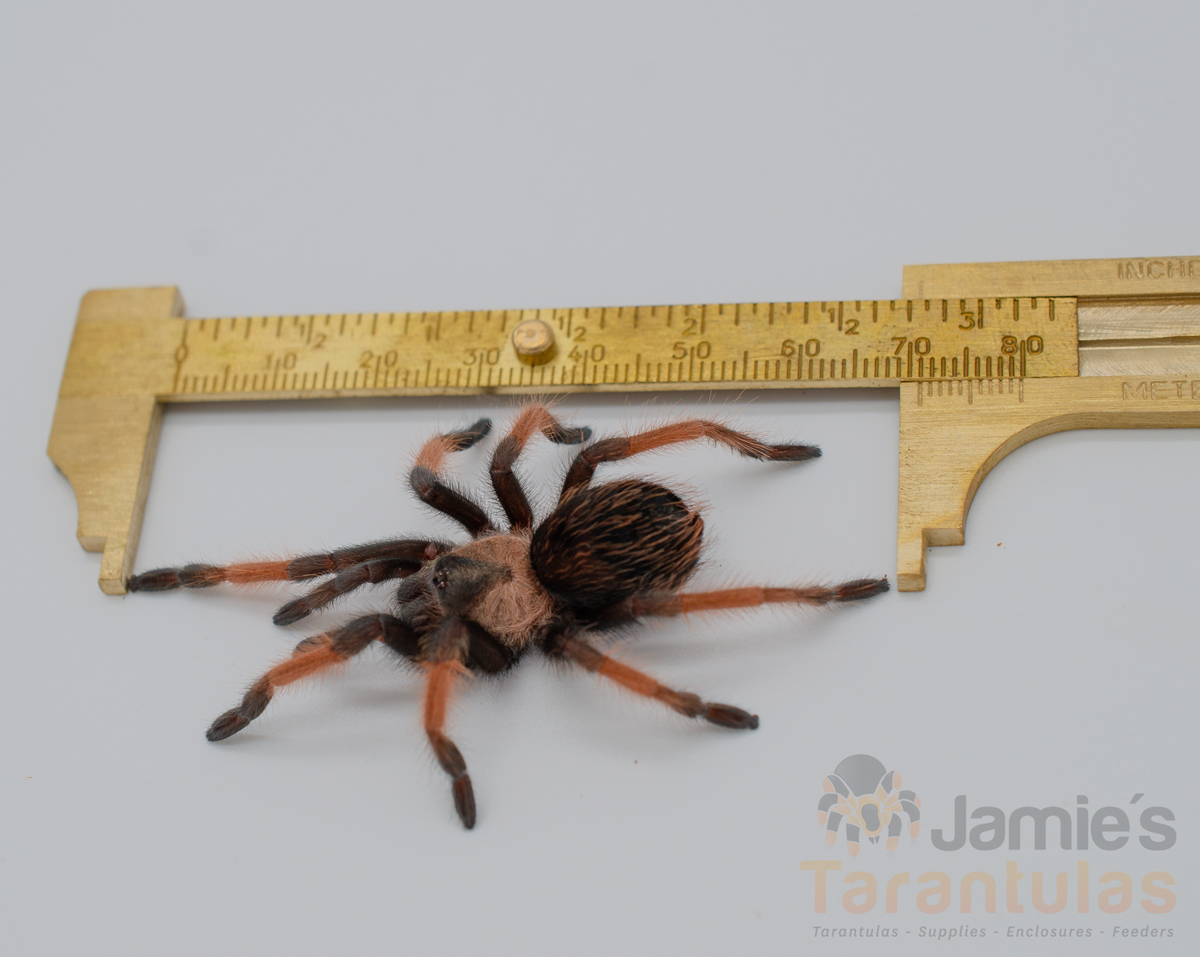
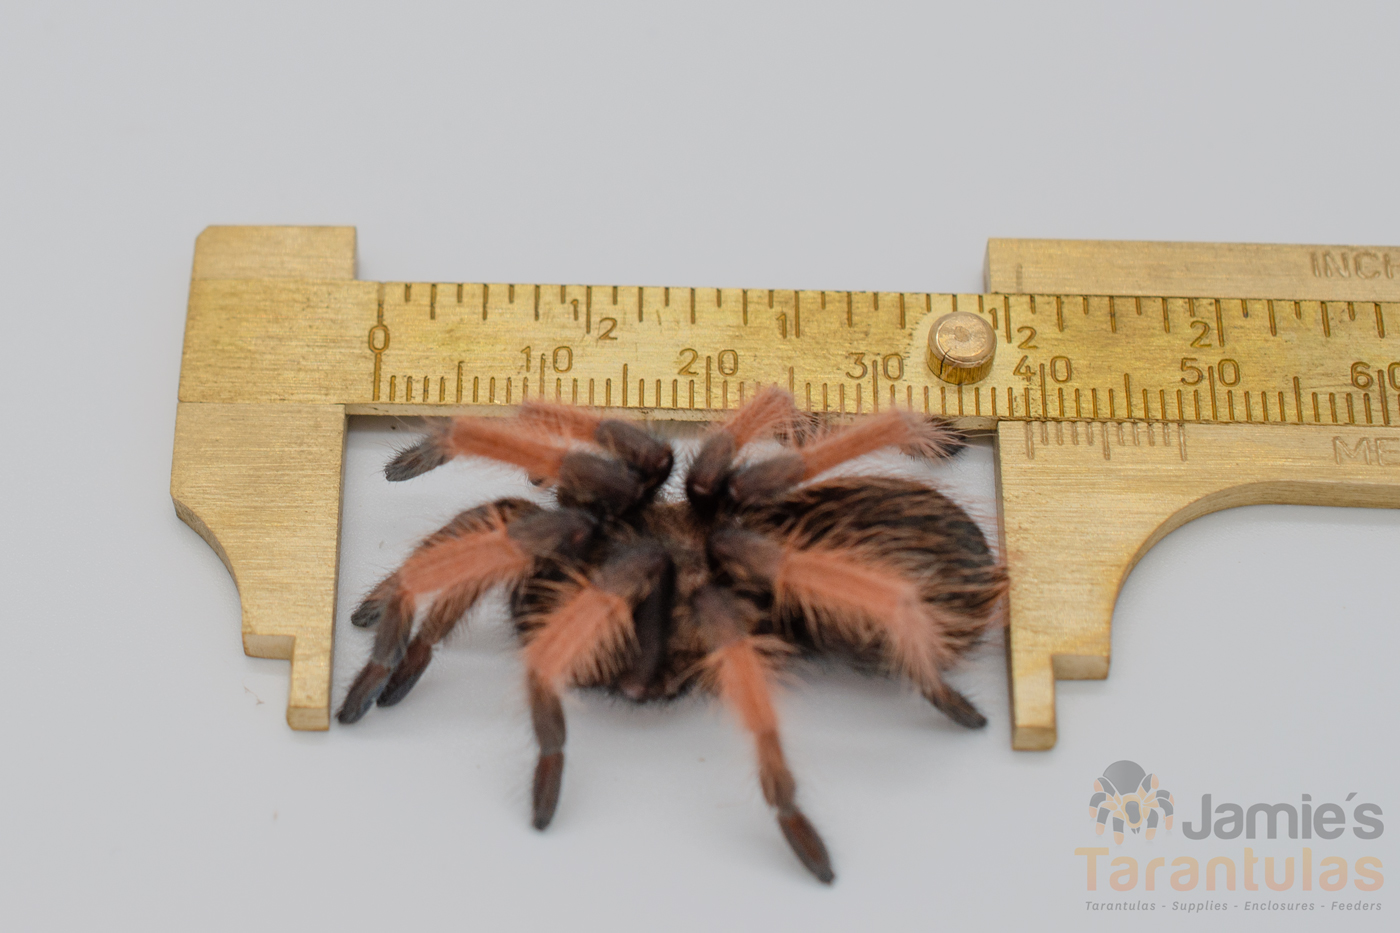
Here is that same female in a different position, this time with the knees bent and the legs tucked close against the body. Check out how this 2 3/4″ female can scrunch up and throw off that measurement so she looks closer to 1 1/2″! Remember, NO BENDS in the knees!

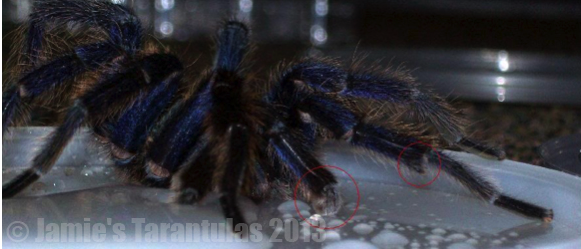
Here is another photo I took to help potential customers visualize small spiderlings. I have set the caliper to 1/2″ inch and marked the diagonal leg span on this little dude (seen in red and black) either side would do for an accurate measurement. I couldn’t get the caliper any closer to this little one without touching it, but even so, with bent knees we can clearly see this little spiderling is well over that 1/2″ mark.

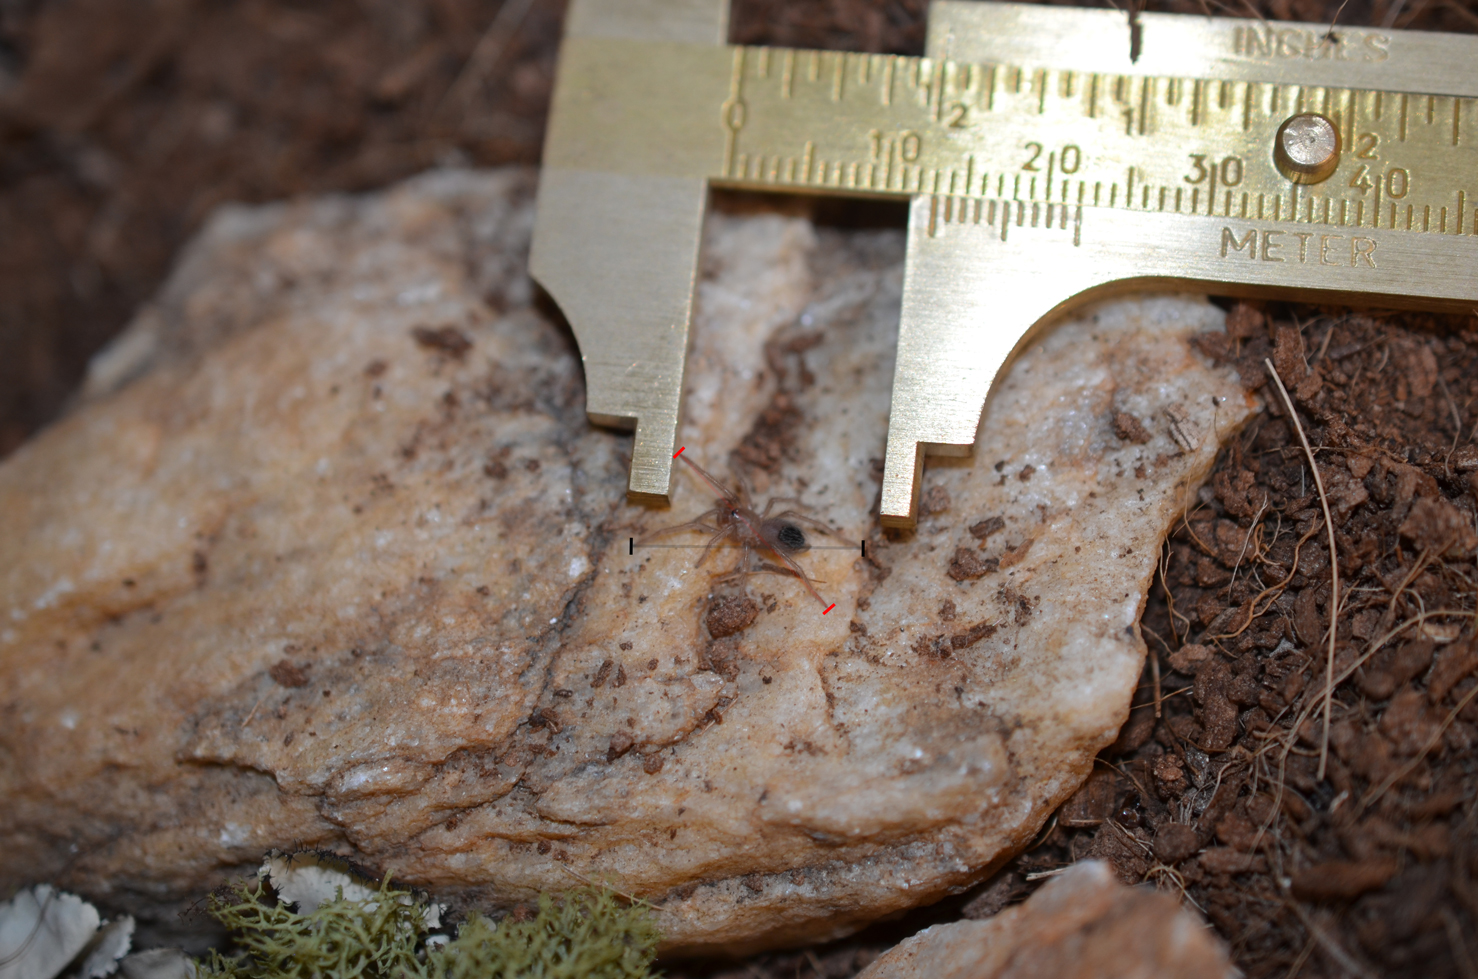
Here is that same L. parahybana spiderling on my hand for more size reference, I wear a size small glove. It is remarkable how this little third instar 1/2″+ LP can grow to 8.5″ or more!

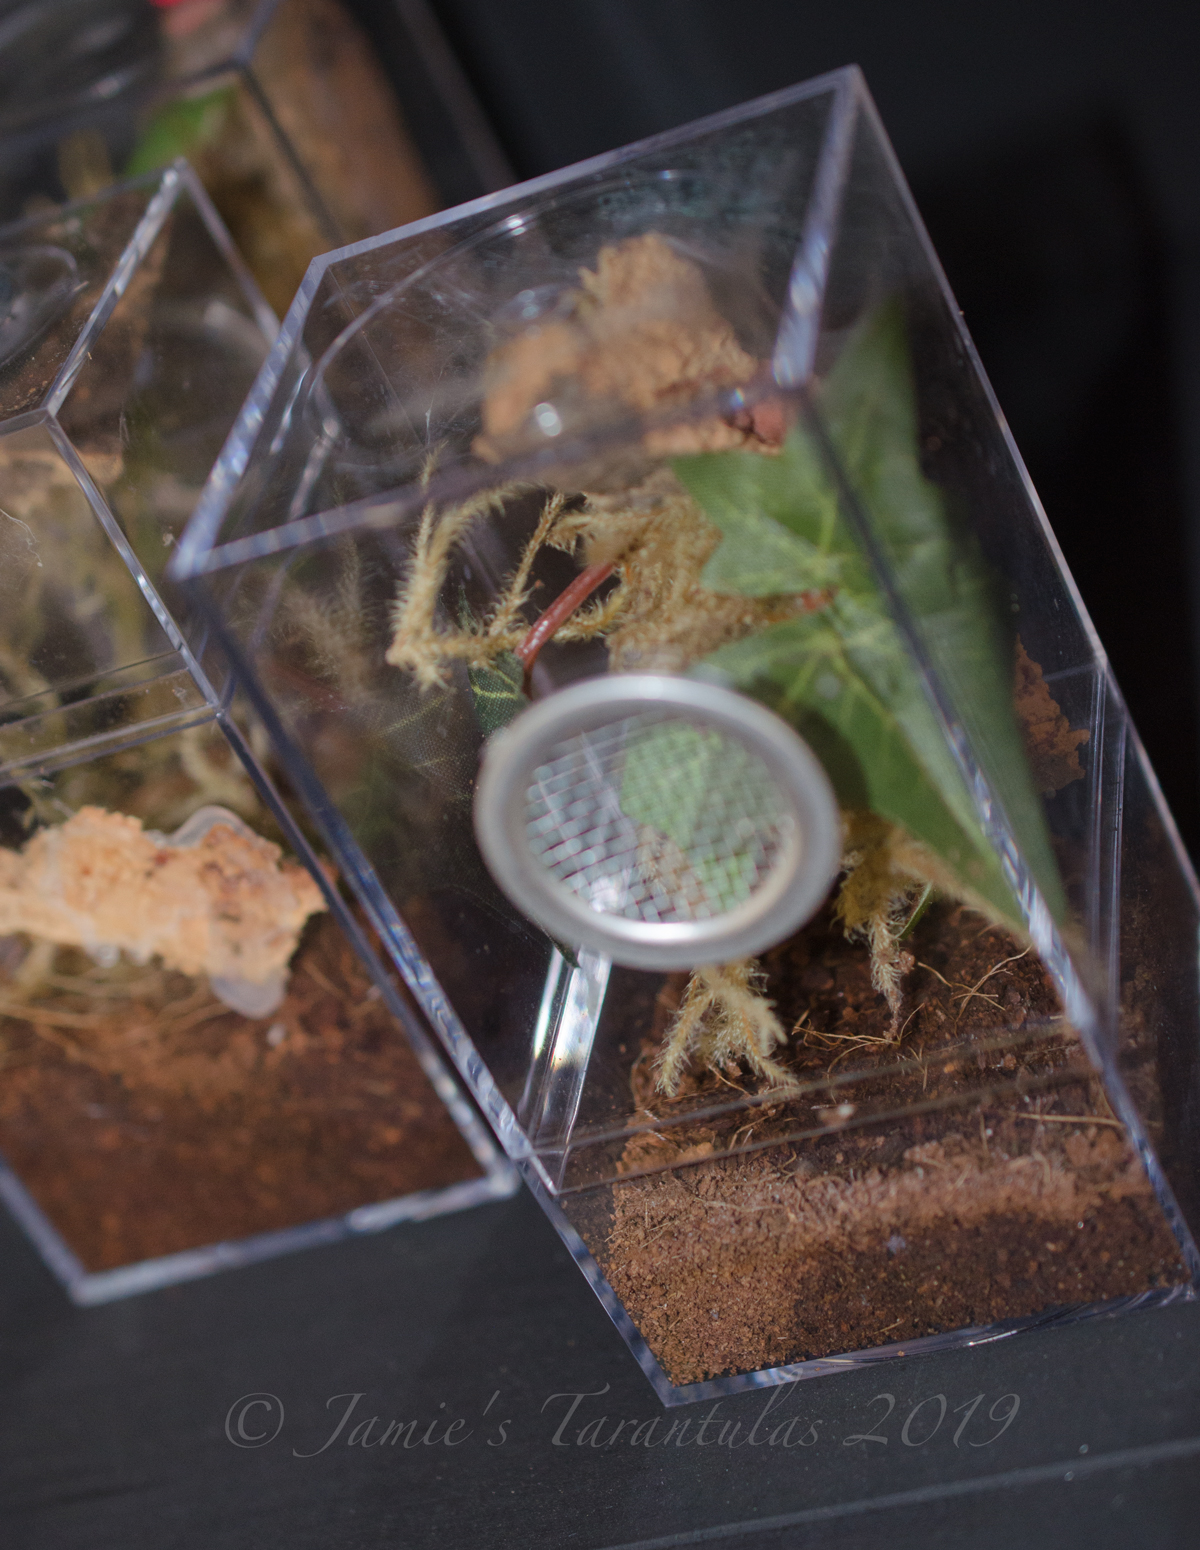
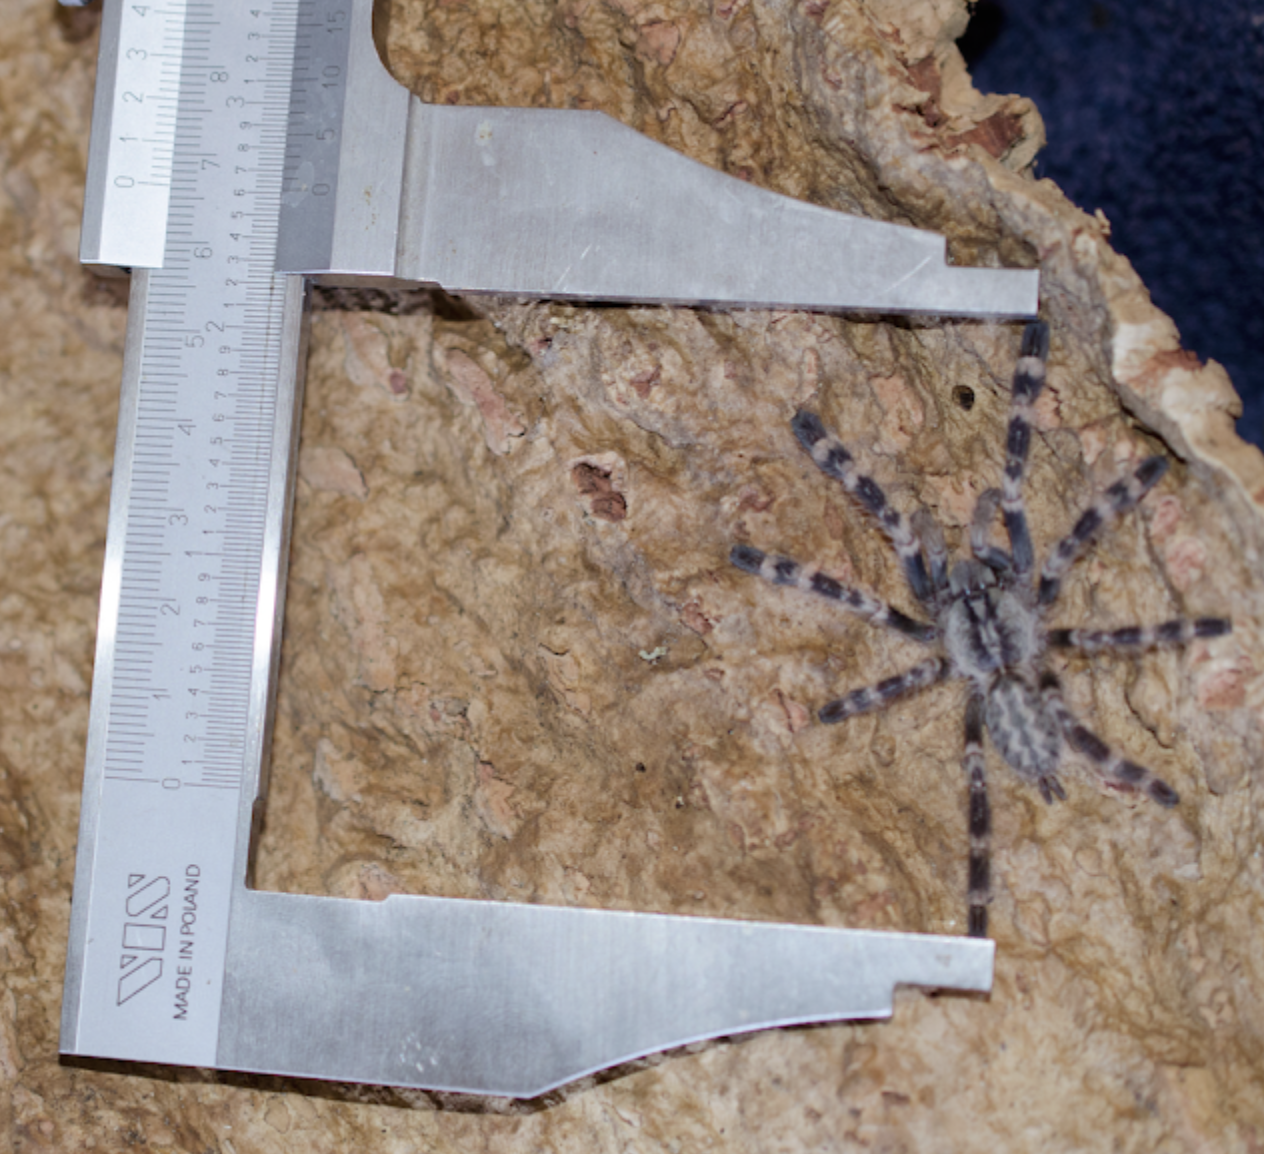
Here is how I measure tarantulas in the real world. It’s MUCH safer and easier when the tarantula is measured inside it’s enclosure like so:

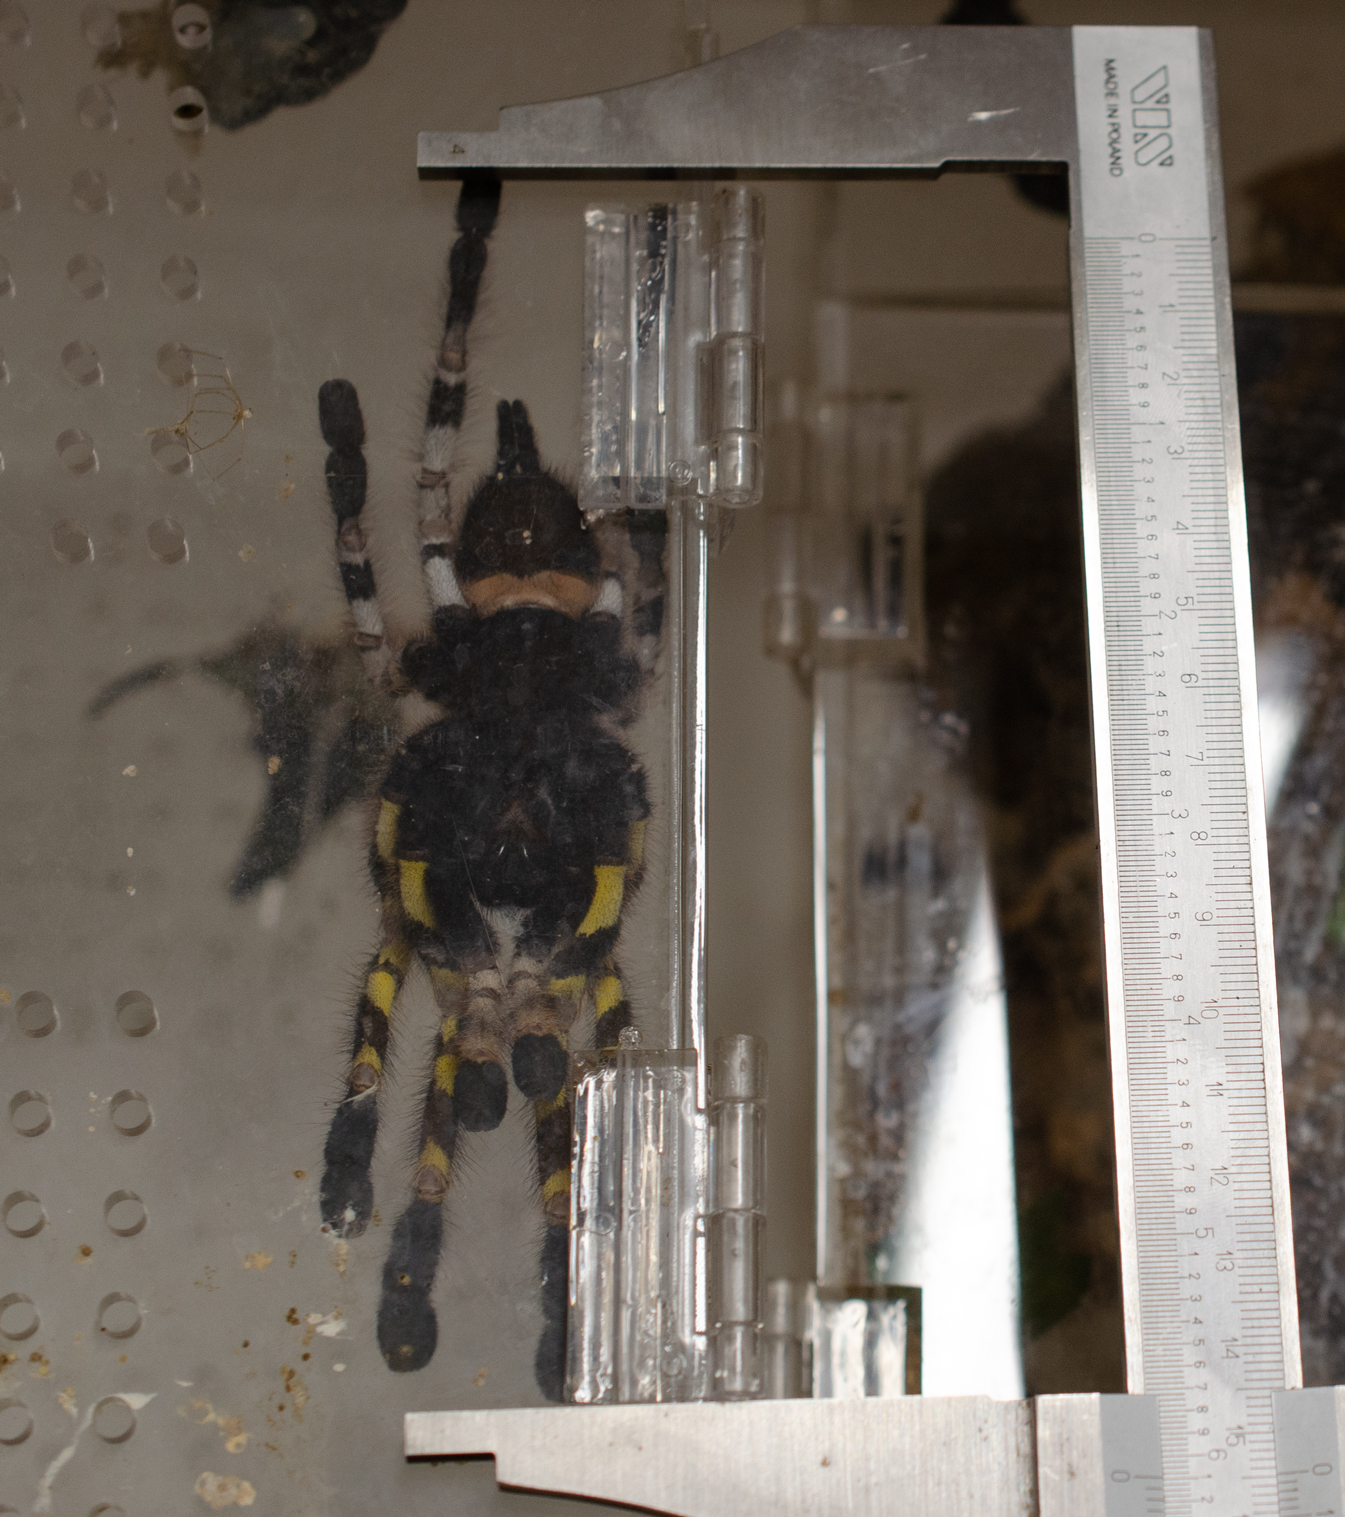
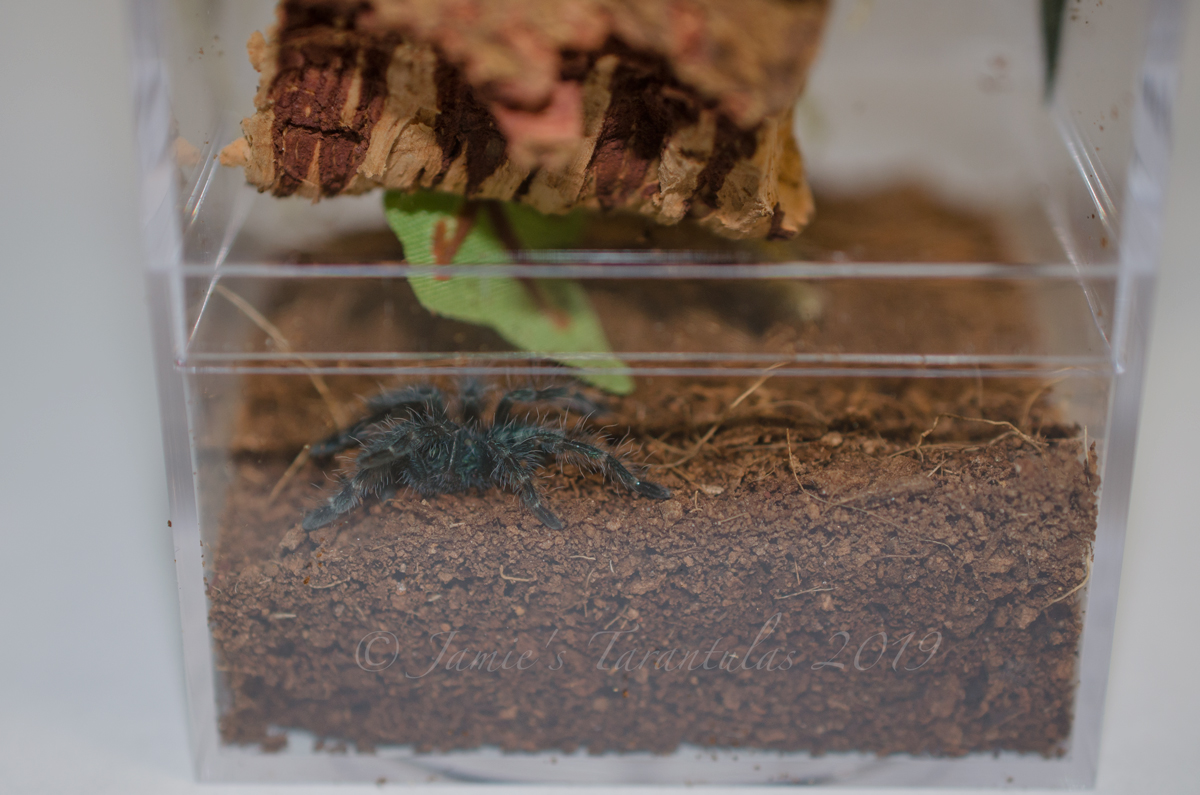
Granted she is not outstretched (again there are bends in her knees) however, we can clearly see she is over 6″ with this measurement.

Don’t be discouraged, it is difficult even for me to get all the bends out of the knees so I usually measure them a little under their actual, fully outstretched size. This gives me a little wiggle room for their ad and I can never recall a customer complaining about getting a slightly larger specimen!

Categories
Main

Determining the gender of a tarantula

Is it male or female?

This is often one of the biggest questions that goes through a keepers mind when acquiring a new tarantula. Females are prized among hobbyists for their larger size, longer lifespans (some species can live decades!) and ability to produce eggsacs. Males are often requested for breeding projects or for those who want a pet with a lifespan (and commitment) of a only few years. Determining the sex of a tarantula can be tricky though, especially when it is younger as male and female tarantulas will often look and act extremely similar until mature.


How can you determine the gender of a tarantula?

The ONLY way to absolutely know the gender of a specimen is to look at it’s molt/exuviae.

The other, and not so reliable method is by looking at the tarantula itself, either ventrally (underside) or dorsally (topside) which we’ll cover later in this article.


What about spiderlings?

With over 35 years combined tarantula keeping experience we still do not know of any method to determine the gender of spiderlings. If we come across even semi-reliable method to sex spiderlings I will update this article with instructions.


So how do I molt/exuviae sex a tarantula?

By using the tarantulas exuviae (also: exuvium) also known as a cast skin or molt. Exuviae sexing, also known as molt sexing is the most reliable way to confirm the gender of a specimen and the only tried and true way to absolutely confirm the sex of larger, immature or mature specimens. In order to properly determine the gender first you will need an intact molt.

Getting an intact, read-able molt is a feat in itself… You must be quick to grab the molt soon after the tarantula has shed it’s skin or else the tarantula is likely to much on it. Bon appétit!

If the molt gets eaten you’ll have to wait until next time for the chance to revel it’s gender.

Not all tarantulas will much on their molt however, if the molt is recovered quickly after the tarantula has shed not only will the molt be soft and pliable (which makes the next step much, much easier) but you won’t give him/her the chance to eat it.

If you are able to get to the molt before it’s eaten be extremely careful not to disturb the soft and very vulnerable tarantula!

I have the intact molt, now what?

Is the molt soft? If not take care not to break it (the molt will crumble easily when completely dry) soften it in some warm soapy water for 15-90 minutes, or overnight. How long it needs to soak depends on how large and how dry it is. Make sure the molt is completely soft before proceding.

With the molt pliable, carefully unwrap the abdomen section. Examine the molt to look for the presence of a spermathecae. This female reproductive organ is where sperm is stored until the eggs are laid.

While a female can be identified by the confirming the presence of a spermathecae, a male can be identified by confirming the absence of a spermathecae.

The spermatheca is located between the first pair of book lungs.

Pictured below is a female Grammostola porteri (Rose Hair). The spermathecae is being manipulated with a toothpick.

The same molt (Female G. porteri) approx. 5 1/2″ DLS. The spermathecae is highlighted in red (below)

The spermathecae will often vary in size and shape depending on the age and species. Aside from using the spermathecae to determine gender this reproductive organ is often used to identify and distinguish certain species.Below is the molt of a 3-4″ female B. cabocla (Brazilian Red Head)Here is the same B. cabocla molt, a little closer, with the spermathecae outlined in yellow:


Now compare these females molts to that of a male Avicularia (Pinktoe) below.

Notice it’s completely flat between the first set of book lungs? There is no flap/presence of a spermatheca confirming this male. Male Avicularia (Pink Toe) approx. 3 1/2″ DLS Has no spermathecae.

The Looking Methods

So, you don’t have an intact molt handy? Be advised the looking methods are not very reliable, can not be used on spiderlings and small juveniles as the smaller specimens look more or less the same (at least to me…)

The exception to this rule is mature males as once a male has reached his mature (also known as “final” or “ultimate” molt) he can be easily identified and his gender 100% confirmed by the presence of his male reproductive organs.

You can use the looking method to visually sex the actual tarantula two ways, by ventral sexing, that is looking at the tarantulas ventral side, the underside of it’s abdomen or by dorsal sexing, this is looking at the tarantulas dorsal or back/top side.

Ventral comes from latin venter meaning belly, stomach or womb. Dorsal form the latin dorsum meaning back and/or ridge of a hill.

We do not use the looking methods to determine gender here at Jamie’s Tarantulas with the only exception of “suspect, not guaranteed males” offered every-so-often. Although the looking methods are not considered to be completely accurate the topic still be covered in depth as to help others to make educated guesses as to the gender of their specimen, at least until an intact molt/exuviae can be recovered.

Ventral Sexing It is possible to make an educated guess at the specimens gender by examining the ventral side of the abdomen. You’ll want to try this with tarantulas minimum about 2″ DLS Ventral sexing is not considered an accurate way to determine gender however, most often the specimens intact molt is not immediately available and we must rely on what we have and accept the answer will only be a “best guess”

Some advice for those wanting to ventral sex: Getting good at ventral sexing is something that comes with experience. No one starts off good at it, In my early hobby days can recall going crazy because I couldn’t detect any difference. I can tell you the more you practice, the better you’ll get! Look at lots of tarantula undersides. It will become easier and easier!

Here is an Aphonopelma chalcodes (Arizona Blonde) 4 1/2″ male first unedited:

Second, we have added a yellow pencil line to show the more flat angle 5-7 degrees between the first pair of book lungs:

Third, we have added another yellow pencil line to show the “triangle” or “arch” around the area of the epiandrous fusillae, only present in males

Here is an Aphonopelma chalcodes (Arizona Blonde) 5″ female first unedited:

Second, we have added a yellow pencil line to show the larger angle of 15-20 degrees between the first pair of book lungs. Notice there is no “triangle” or “arch”?

Originally I took photos of Brachypelma emilia for this ventral sexing article however, their black undersides did not make for good, clear photos. I then choose the lighter-colored Aphonopelma chalcodes (Arizona Blonde).I must warn sexing from photos can be difficult to impossible. Personally, it’s hard for me to look at something 2D representing a 3D image. Sometimes the lighting can play tricks on us, and lightening photos can sometimes reinforce sometime that was never really there.This article is using photos of an adult and sub-adult lighter-colored species, the absolute best I could find for this job from my vast collection. These photos I personally took and was very careful about selecting for this article, I wanted to make sure they easialy and accurately showed the visual differences between the two genders.Keep in mind that typically the smaller/younger the specimen the specimen is, the more subtle the differences. The darker the color, the harder it typically is for me to make a good ventral best guess.Determining gender from a photo is very difficult and even those (such as myself) with some experience ventral sexing will likely have much more difficulty sexing from a photo vs being there, looking at the tarantula. We appreciate if those refer to this and other resources online for general sexing, and to try to get eyes on your own spider(s) to gain the experience to get better at sexing. I recall in my early hobby days it was so difficult but with time and practice it gets easier to make an “educated guess.” Don’t get discouraged and stick with it. You will get better with time and experience!

Here are some easy-to-spot visual characteristics between mature males and mature females

…that don’t require looking at their underside.

When a male matures (has his final or “ultimate” molt) he gains some distinguishing characteristics such as “tibial hooks” (present in most species) and bulbous pedipalps which are often referred to as “boxing gloves”

Mature Male C. cyaneopubescens (Green Bottle Blue) “Boxing gloves” are circled left & tibial hooks are circled right Also notice the lankier overall appearance, including longer legs and smaller, more narrow fangs of the mature male…

Mature Male C. cyaneopubescens (Green Bottle Blue) below:

Mature Female C. cyaneopubescens (Green Bottle Blue) pictured below:

What about this photo? Of these two B. hamorii/smithi (Mexican Red Knee) can you tell which one is the mature male and which one is the female?

The male can identified (top) by the presence of his “boxing gloves”. One of his tibial hooks is just barely visible (as a cream colored lump) on the right side near where they’re “holding hands”. Just like the GBB notice the males lankier overall appearance, including longer legs and smaller, more narrow fangs when compared to the mature female (bottom)Here is the same photo again, with the males “boxing gloves” and his visible tibial hook circled in yellow:

Dorsal sexing immature specimens:

Larger juvenile and sub-adult specimens can sometimes be identified by their “body type.” Just like the adult male GBB and B. hamorii/smiti adults pictured above immature males typically have a lankier overall appearance including longer legs and smaller, more narrow fangs when compared to the females same size DLS. Be aware that females of most species go though a leggy adolescent phase and can be sometimes be mistaken for males during their “awkward teenage” years. Occasionally I might see an unusually stocky immature male.

We hope you found this article useful!

-Jamie

For those looking to purchase from Jamie’s Tarantulas:

If the gender of the specimen is known it will be included in the title.

If the gender is unknown no gender will be stated and the specimen will be sold as “un-sexed”.

Those tarantulas are sold as “unsexed” because we are unable to determine, or even guess their gender at this time.

We do not attempt to “pick out” females or males from the “unsexed” specimens.

Your chance of getting a male/female is roughly 50/50 with an “unsexed” specimen.

Categories
Enclosure Main

Arboreal Spiderling Kit Set-Up: C. versicolor Part II

This is an update to Part I. Click here to read: Arboreal Spiderling Enclosure Set-Up: C. versicolor Part I.

Update at 1 week:

I was gone for the weekend and we were expecting cooler, rainy weather. Not so! Blueberry dried out more than I would have liked. If anyone wants to know if their enclosure is way too dry for a C. versicolor, this is a good example.

Blueberry is thirsty enough to come down onto the substrate in search of water.

It is important to let the enclosure dry out every so often to help prevent mold and mildew however, if left like this much longer it could cause a problem…

…so let’s give it a little mist!

…but don’t mist with a heavy hand! Too much moisture can be just as problematic as too little.

Update at 10 days: 

Notice the enclosure is already quire dry again after 2 days? Keep in mind you’ll likely have to mist more often if the air surrounding the enclosure is warm and dry vs. cooler, more humid conditions.

Given some time to settle and hydrate today Blueberry is hangin’ out the front door in what we refer to as the “I’m hungry pose”

So let’s feed Blueberry!

With my Arboreal Spieling and Arboreal Juvenile enclosure kits I will do one of two things. If I don’t have time to watch them eat I might put a roach or two on the substrate. If I have a minute or two I feed using the Upside-Down Method. 

The first step is to carefully remove the enclosure lid containing the little arboreal tarantula. Like so:

The tarantula will likely be unsettled when the enclosure is moved. If possible, let the enclosure rest for a few minutes before offering food. This way the tarantula will have a little time to relax after it’s been moved and flipped over.

Then add one single appropriate-sized roach and wait:

…Got it!

Carefully flip it rightsize up. If you’re gentle enough it won’t disturb the tarantula too much. Although the photo is out of focus we can still see this is one happy C. versicolor!

Update 12 days:

Categories
Enclosure Main

Arboreal Spiderling Kit Set-Up: C. versicolor Part I

For this tutorial we’re going to build an Arboreal Spiderling Enclosure Kit for a baby C. versicolor (Martinique Pink Toe) spiderling.

We will be using hot glue gun to assemble the furnishings. Be sure to get your gun warmed up before you start!

The Arboreal Spiderling Enclosure Kit is recommended for arboreal (tree-dwelling) spiderlings 2″ leg-span and under.

The enclosure kit will come wrapped so it’s not damaged or doesn’t come apart in transit (first photo) after unwrapping the enclosure (second photo) you’ll have five parts:

-Cork bark

-Artificial plant

-Cocofiber substrate

-Decorative moss

– 4″ x 2.25″ x 2.25″ Enclosure with 1″ vent

As we typically maintain our small spiderlings to drink “dew” from the enclosure walls our spiderling kits do not contain a water bowl.

While traditional enclosures typically open in a location that interferes with the arboreal species webs, the Jamie’s Tarantulas Arboreal Spiderling Kit is designed for the comfort and ease of both owner and their tree-dwelling pet.

One of the enclosures many features is it opens from the bottom to avoid damaging the webs/home of the arboreal who likes to build up high.

Before I assemble everything I like to get an idea of where the furnishings are going to go. I want the spiderling to have lots of things to attach it’s web to near the top of the enclosure. I also want it to have easy access to the bottom if the enclosure in case it wants to climb down.

Here I’m sizing up the cork bark in the enclosure, trying to get an idea of how to arrange everything.

Ok, looks good.

Let’s add some plants and moss. First a little hot glue where we want everything anchored:

Take the plant stem and carefully put the base in the hot glue puddle. I like to hold the plant by the leaves as to keep my fingers as far from the hot glue as possible. Note: the artificial plant stem may need to be broken down further before assembly.

Now cover the hot glue spot and stem base with a wad of moss.

This part can be a little tricky without practice. I recommend to balling up the moss and make sure there is always a safe amount of space between your fingers and the hot glue.

Once the glue was cooled down you can remove the strands of moss that didn’t get caught in the glue. I very, very gently tug and if it comes free on it’s own I will remove it strand by strand. Also, remove all glue gun residue/strings that might bother the tarantula.

Here is what we have so far. Now for some more glue…

More plants and moss…

Thin the moss, if needed (gently!) and remove any excess hot glue residue

Test fit your cork bark one last time, just to be sure that’s where you want it. Take note where the cork comes in contact with the enclosure. Put a one or two pea-sized hot glue spots on the contact points and press and hold where you want the bark to adhere.

Looks nice!

Make sure the glue is completely cool before adding your tarantula.

Also, we recommend a light mist so the tarantula has an opportunity to drink.

The little guy or gal is likely stressed as can typically be expected when rehoming any tarantula.

Think about it from the slings perspective. This tiny, blue fur-ball can’t find the trail back home. It’s terrified, lost and exposed in a totally unfamiliar and likely dangerous place.

The sling needs some quiet time to settle in before any feeders are offered. We’ll wait about 4 days before trying to feed this C. versicolor.

We’ll check back soon to see how “Blueberry” is doing!

Categories
Main

Welcome to our new blog!

Although it’s long overdo we are proud to introduce our new information site & blog.

May 4th 2020  PLEASE BE PATIENT! IT WILL TAKE SOME TIME TO MOVE & ADD NEW POSTS

The purpose of this part of the website is to share what I have learned in many years of keeping, rearing, breeding and just plain geeking-out over tarantulas. We will focus on a variety of topics including tarantula basics such as IS A TARANTULA RIGHT FOR ME?, HANDLING, HOW TO MEASURE, HOW TO DETERMINE GENDER as well as FEEDING & WATERING, CARE & MAINTENANCE, ENCLOSURE ASSEMBLY, HOW TO ORDER A TARANTULA ONLINE, SAFE UNPACKING & REHOUSING, CREATING & MAINTAINING A FEEDER COLONY and more!

I will focus on creating the majority of the articles and videos for beginning and intermediate keepers however, I will also include content for those interested in more advanced, specific or unusual tarantula topics such such as INDIVIDUAL SPECIES CARE SHEETS, COMMUNALS, LIVE PLANTED ENCLOSURES, HOW TO SHIP A TARANTULA, WOES OF A RUNNING TARANTULA BUSINESS, BREEDING, INCUBATING & REARING YOUNG SLINGS, etc.

Some of the articles might be recognizable as updates brought over from my old blog although the vast majority of what’s going to be included here will be new content for 2020.